Friday, 5 August 2011

Apache Camel and SubEthaSMTP

There are times, having or relying on more than one set of library to do your bidding can be very helpful to streamline and simplify your projects. One example is, although Apache Camel has very powerful integration capabilities, there are times that you might want to do further processing using other libraries to get the benefits of encapsulating changes from your possibly already complicated rules in Apache Camel.

One such example is sending out information to users. You might opt to say, use Apache Camel to send out mails, but instead of to a typical SMTP Server, send it to SubEtha SMTP, which is purely a JAVA library that receives email and pass it to your handler for further processing. It will not be storing or even doing the actual mail delivery. An excerpt from their website (with link to their project)

SubEtha SMTP is a Java library which allows your application to receive SMTP mail with a simple, easy-to-understand API.

Typical interesting scenarios you might want to use this:
  • perform filtering on the sender and recipient to weed out inactive or barred users
  • log email messages to files or database
  • instead of sending mail, lookup recipient preference and optionally send via other channels such as IM (Instant Messaging) or SMS.
  • Configure multi-channel send, e.g. Send email to recipient(s), and send notification to them via IM or SMS to inform them about the email header and sender, e.g. You have a mail from development.rants@gmail.com - "Automated Backup for Server BBIGGG completed successfully"
  • Analytics or Statistics to determine how many emails are sent to a specific recipient, and how many emails with a particular subject is sent.
 Using SubEtha SMTP is simple, all you need to do is to assign a MessageHandlerFactory to its constructor, which is responsible in creating MessageHandlers to handle incoming mails. A simple example is below:

1: SMTPServer server = new SMTPServer(new MyMessageHandlerFactory());
2: server.setMaxConnections(100);
3: AuthenticationHandlerFactory fact = new
     LoginAuthenticationHandlerFactory( new Validator() );
4: server.setAuthenticationHandlerFactory(fact);
5: server.start();
 
Line 1 is used to associate your message handler factory (which implements the: org.subethamail.smtp.MessageHandlerFactory interface).

Line 2, which is optional, can be used to set maximum number of connections

Line 3 and 4 are use to setup authentication handlers, in case you would like to authenticate incoming connections.

Line 5 is used to start the server.

In version 3.1.6 of the library, it comes with two higher-level interface and adapter to help to ease construction of your Message Handler, which are the SimpleMessageListener and SmarterMessageListener.

That's all for a start. I'll try to write a more complete example in my next article.

Enjoy processing emails!

Sunday, 24 July 2011

Apache Camel: Email notification when files are placed in FTP folder

I love getting automated notification when events occur rather than having to perform manual checking. As an example is, instead of having to login to FTP and check whether files are uploaded to a particular FTP folder, it will indeed be much more elegant if an email notification can be sent to me automatically to inform me about that fact.


For this article, you can use the Apache Camel project created from my previous blog article. Also, let's enable Apache Camel logging so we can see debug output for ease of understanding what's going on. Verify if you already have log4j.properties in your project (should be in Other Sources -> src/main/resources -> <default package> folder under your project. If it is there, you might want to skip to the FTP and Email section.
To do so, first, ensure that you add dependency for slf4j-log4j12 for the appropriate version of slf4j you have (mine is 1.6.1). You can follow the instructions in my previous article to add the dependency (if you are like me, using NetBeans 7 and Maven).


Next you need to click on the Files tab in your NetBeans project, go to your project and expand to src\main, right-click and select New -> Folder. Create a folder named 'resources' (without quotes, of course).
After that, right-click on the resources folder you have just created, and select New -> Properties File. When the New Properties File dialog appear, enter log4j as the filename. The Folder should be src\main\resources (if you indeed right-clicked on the resources folder). As per screenshot below:


Enter following info into your log4j.properties file:

log4j.rootLogger=TRACE, out

log4j.logger.org.apache.camel=DEBUG

log4j.appender.out=org.apache.log4j.ConsoleAppender
log4j.appender.out.layout=org.apache.log4j.PatternLayout
log4j.appender.out.layout.ConversionPattern=[%30.30t] %-30.30c{1} %-5p %m%n
The file should be accessible from Projects tab in the following navigation under your Project folder: Other Sources -> src/main/resources -> <default package>


Next, add dependencies for both camel-mail and camel-ftp.When done, amend your routing code to:


        context.addRoutes(new RouteBuilder() {
            public void configure() {
                from("ftp://ftp.myftp.com/test?username=myuser&password=mypass&noop=true")
                    .setBody().simple("Hi, new file uploaded to ftp. Name: ${header.CamelFileName}")
                    .setHeader("subject").simple("Received filename: ${header.CamelFileName}")
                    .to("smtps://smtp.gmail.com?username=development.rants@gmail.com&password=******");
            }
        });

The above example (fictitious account info), will check the test folder in ftp.myftp.com for user: myuser. When found, it will send an email to my gmail account development.rants@gmail.com. The sender is of the same email account. An email will be sent for every file found in the ftp account, so for testing purposes, please ensure that you do not have too many files in this folder.


You may also want to modify the call to Thread.sleep in App.java to a longer time, e.g. 60 seconds, as below:


        Thread.sleep(60000);


Next, build and run the project, and voila! You will start receiving emails when files are uploaded into the ftp folder being watched.


For this article, notice that I am using noop=true parameter for the ftp url. That will means the file will be left in that folder as it is. This is useful if you are running the program a few times and wants to be able to test without needing to re-upload files to the ftp folder.


For more options you may want to refer to the Camel FTP component documentation here.


Enjoy!

Wednesday, 6 July 2011

Using NetBeans 7.0 to create an Apache Camel project without Spring dependency

NOTE: This article was rewritten to fix the issue of unable to create a new project based on the apache camel quickstart archetype.

Despite the conveniences offered by the Spring Framework, there are times I would rather live without it, especially for simple applications that I need to keep as lightweight as possible. To do this, the steps are below:

1) Create a new Project in NetBeans 7.0, and choose Maven -> Java Application, and click Next.

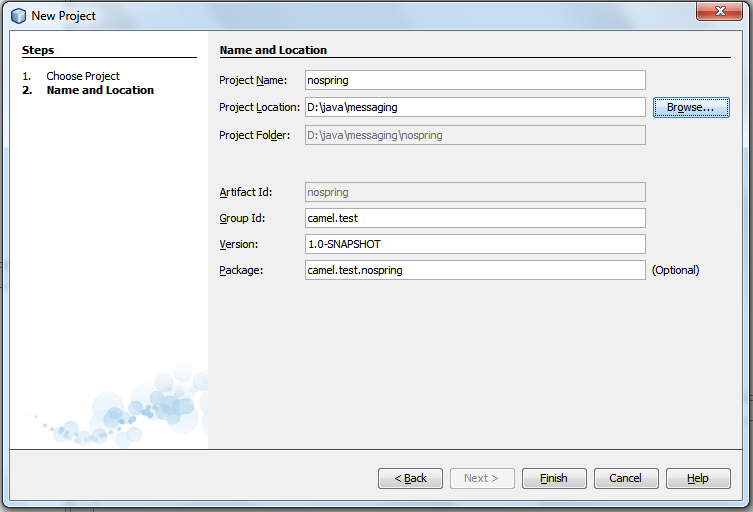
2) In Step 2 of Project Wizard, enter your project name, and amend the other settings such as Project Location, Group Id, as you deemed fit.

Once done, click Finish, and wait for the Project setup to be completed.

3) Expand your Project from the Project Tab, right-click on Dependencies folder  and select Add Dependency...


4) In the Add Dependency dialog box, enter camel-core in the Query textbox under the Search tab. Once the Search Results appear, expand org.apache.camel: camel-core folder and click on the version you require, or the latest version available (currently latest is version 2.8.0) [bundle]. Central or Local should not matter, as you should only have Local if you have downloaded it before (either directly in your project or indirectly in other projects with camel-core dependency).


     Click on the Add button.

5) Now expand the Source Packages in your project and you should be able to find App.java. Modify the main class to the code below:

    public static void main( String[] args ) throws Exception
    {
        CamelContext context = new DefaultCamelContext();

        // add our route to the CamelContext
        context.addRoutes(new RouteBuilder() {
            public void configure() {
                from("file:src/data?noop=true").
                    choice().
                        when(xpath("/person/city = 'London'")).to("file:target/messages/uk").
                        otherwise().to("file:target/messages/others");
            }
        });

        // start the route and let it do its work
        System.out.println("Starting");
        context.start();
        Thread.sleep(20000);
        System.out.println("Done");
        // stop the CamelContext
        context.stop();
    }

    You will need to add the necessary dependencies.

6) You can now run the application, which will read any files in your src/data folder, and parse the xml, and move the file to either the target/messages/uk or target/messages/others folder depending on whether the person -> city node contains the value 'London' or not.

    If you followed my previous blog entry 'Using NetBeans 7.0 to create a new project using Apache Camel', you should have sample message1.xml and message2.xml under your src/data folder, which you can use for testing purposes.

    
All folders here are relative to your project folder. Until my next blog, Good Luck and Good Bye!